Learn something useful: A tutorial to the Google Maps API for weddings vizualization
Let’s learn something useful today! I have always been interested in data vizualization and my recent addictions to data analysis is pushing me to try new things.
One very notable API that I have never got to play with yet is the Google Maps API (actually I have used it a lot on iOS but never in JavaScript).
Turns out I have the perfect problem to go with it: having trekked around the globe my wife and I have the pleasure of being invited to weddings all around the world. We try to go as often as we can.
The list for 2013 has been growing very rapidly and it seems it would be quite a challenge to attend all of them. The goal of this little exercise is to:
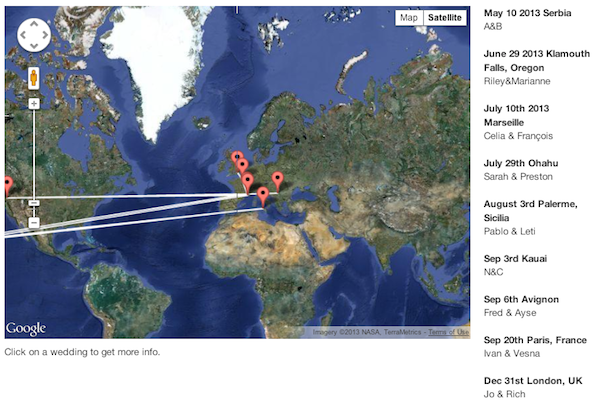
- Display all the weddings that we have been invited to on a map;
- Show the trips required to go from one to the other (assuming we do nothing in between);
- Let the user interact with the visualization: click on weddings to get more information.
Let’s build this together.
In this tutorial we will use the latest version of the Google maps API: v3.
First step: Get a google maps API key
Go to the Google API console with your Google Account and enable “Google Maps API v3”.
You can then click on “Google Maps API v3”, go to “API access” and get your API key. If you want (and you should) you can restrict your token to be used only on your domain. Otherwise someone could steal your token and use it on another site (then they could use up the 25000 requests per day that Google grants you for free; or do stuff that violates the google api usage agreement).
Step 2: Include the google maps API
Add a call to the JavaScript API in your document’s head. You need to change two parameters:
key: set to your API keysensor: set to true if you want to use the device GPS to display the user location
<script type="text/javascript"
src="https://maps.googleapis.com/maps/api/js?key=YOUR_API_KEY&sensor=SET_TO_TRUE_OR_FALSE">
</script>Step 3: Create an html element to hold the map
This is pretty straightforward:
<div id="weddingsMap" style="width: 100%; height: 100%"></div>Step 4: Create the map
Create a global map object:
var map;Create a function to initialize the map:
function initializeMap() {
  var mapOptions = {
    center: new google.maps.LatLng(-34.397, 150.644),
    zoom: 8,
    mapTypeId: google.maps.MapTypeId.ROADMAP
  };
  map = new google.maps.Map(document.getElementById("weddingsMap"),
      mapOptions);
}
Make sure this function is called when the page is loaded:
<body onload='initializeMap();'>Step 5: Transform an address into longitude and latitude
Declare a global variable with your geocoder object
var geocoder;In your initializeMap() function, instantiate a geocoder.
function initializeMap() {
  // Initialize the map here
  // ...

  // Create a geocoder object
  geocoder = new google.maps.Geocoder();

Call the geocoder with a callback that adds a marker to the map.

  geocoder.geocode( { 'address': wedding.where},
    function(results, status) {
      if (status == google.maps.GeocoderStatus.OK) {
        map.panTo(results[0].geometry.location);
        var marker = new google.maps.Marker({
          map: map,
          animation: google.maps.Animation.DROP,
          position: results[0].geometry.location
        });
        google.maps.event.addListener(marker, 'click',
          function() { clickWedding(wedding); }
        );
      }
      else {
        alert("Geocode was not successful for '" + wedding + "' for the following reason: " + status);
      }
    }
  );
Notice that we also use map.panTo() to animate the map to the new coordinate and we use a drop-pin animation. We have also attached an event listener to the pin.
Step 6: Draw a line between all the points
Declare a global Polyline variable and initialize the object in your initializeMap() function.
// Prepare a polyline object
polyline = new google.maps.Polyline({
  path: [],
  strokeColor: "#0F0F0F",
  strokeOpacity: 0.7,
  strokeWeight: 2
});
polyline.setMap(map);
Add some code to the geocoder callback to actually add a new point in the polyline.
polyline.getPath().push(wedding.latlong);
$("<p><strong>" + wedding.when + " " + wedding.where + "</strong><br/>"+wedding.who+"</p>")
  .hide()
  .appendTo("#weddingList")
  .fadeIn(500)
  .click(function() { clickWedding(wedding); });
Step 7: Finalize
Check out the final result and the source code.
I have put my data (the list of wedding) in a JSon object in the page and add the weddings one after the other. I have added some jQuery animation to display a list of the wedding on the right on the map. They are clickable, just like the markers.
Conclusion
This was a fun little afternoon project. As I expected it is extremely easy to do some very interesting data vizualization with Google Maps.
As always, please share your comments and feedbacks below!
And I hope you will forgive me if I do not make it to your wedding :(
References
- The Google Maps API documentation is excellent and highly recommended.